Sunday, August 28, 2011

PARTY.COM

It's your birthday and Sir Oliver is oh soooo excited about it!  Isn't he the cutest thing?  How do you like that plush, regal pillow he rules from?  I won him from the Digi Doodle Shop and I also found this free (yes I said free) sentiment there too! Oh and guess what?  There's a sale going on there too!

I colored him with my Copics, took a brush and added some light spots of Memento Tuxedo Black Ink in his fur.  Sir Oliver is cut out with my round Spellbinder and the mat is cut with my brand new "Floral Doily Motif" spellbinder.  The hat is a Sissix die. Both of the designer papers are from the DCWV pad, "The Linen Closet".  I love the soft shades of this pad and lots of glitter in just the right place too.  The craft card stock is
SU and I am not sure if the textured card base is SU or some I picked up at Michaels or AC Moore.

The border punches are MS Presents and the Paw Prints is from EK Success.  When I first saw the presents, I thought they needed a little glitz so I used some Star Dust Stickles.  After I did that I thought it was too much.  I punched another border and glued it directly on top of the first glittered one.  I really liked the dimension and  it allowed just the right amount of sparkle to shine through.  The sparkle yarn is from my stash.

I am entering this in the following challenges:

Digi Doodles Shop - Anything Goes
Simon Says Stamp - It's A Sketch
Crazy 4 Challenges #C4C102- Anything Male
Charisma Cardz Challenges - Glitter It
Papertake Weekly Challenge - Dies to Die For

Look at what retirement has done for me.  I surf, craft and nap.  All is well in my world.  Here's hoping all is well in yours too!  Have a great week!  Lots of Hugs!


Saturday, August 27, 2011

What To Do When Irene Comes To Visit

What do you do when you live on the coast and a hurricane is brushing by with rain and wind?  Clean, organize and move your craft space, that's what!  Longtime followers of my blog know that I had my craft space set up in my kitchen.  I kept everything in plastic containers to keep it grease free (Paula Deen is my hero) and I used my kitchen table as my craft table.  That worked very well.  I cooked and even did my laundry while I crafted.  All was happy.

Then On August 10, 2011 my  bank introduced me to a new initiative.  It was called the 2011 Workforce Reduction Initiative.  They closed branches and laid-off 57 people.  I was one of those selected.   Now woe is me, but you all know I have wished I could stay home and color all day.  My wish was granted.  I now consider myself retired until another opportunity comes along to finance my Copic purchases.

My DH is already retired and sat in the living room watching TV while I sat in the kitchen crafting.    I felt guilty leaving the poor soul out there enjoying himself all alone and also got tired of getting up so he could tell me something or see something on TV.  So I moved my craft space right into my living room.  I took my entire Christmas Tree corner.   This arrangement has made our 2 furry children happy since they would rather sit at my feet on soft carpet that on the hard wooden floor in the kitchen.  So now my Christmas Tree will go in the kitchen and all is happy in Turtle Land.

The drawers on the left house all of my loose stamps, stamp pads and other supplies.  The stack in the middle house colored pencils, tools buttons and gemstones.  My tool, flowers, bakers twine, glues and other things are on top.

The stack on the left bottom is my 12x12 papers and the stack on the top is my 8 1/2 x 11 papers.  The stack on the bottom right is all my scraps sorted by colors.  The black box on tip is my container  of  Flower Softs.
My Cuddlebug  and two of my adhesive machines sit on top of that ( 9" one is under the table).

Under the table is my light board, assorted other necessities, two containers of stickers, a tote full of punches and the trash can which needs to be emptied.

Hope you enjoy my new crafting space.  Come on over and craft with me.  I just might serve you a yummy piece of cake like this one.  This lovely creation was made by my daughter.  She was taking a class and this is her first attempt at making flowers.  Isn't it phenomenal?  I do have to tease you a bit, but it tastes as good as it looks too!  Sure you don't want a piece, I have Dunkin Donuts coffee too!
Posting this one over at Sassy Cheryl's Show Me Fun.  Grab your camera, snap a picture of what you are up to and post there too.  You just might win a digi from Sassy Cheryl and you will have the opportunity to snoop into the lives of some really crafty people.  Happy Saturday to all!

Linda


Thursday, August 25, 2011

Storytime

Sassy Judy gave us a lavender, white and green challenge this week at SassyCheryl's.  Cheryl just put this sweet little Story Teller in her shop and I HAD TO HAVE IT!!!  When I saw it I thought about Goldilocks and the 3 bears story.  I think this week's challenge was meant to be for me.  I had bought this purple and green plaid paper a while back at Aww Shucks, the purple and green polka dot ribbon from Hobby Lobby  and I had seen this particular fold on a couple of blocks last week.  Well it just all came together easy peasy.

I printed the Story Teller 3 times, cut all 3 bears out and Goldilocks once and colored with them my Copics.
To make the base card, I used a green SU card stock layered the plaid and cut a wide polka dot strip.  Adhered all three together.  Doesn't this story fit perfectly on this tri-fold card?

To make the base shape:
Fan-fold a 8 1/2 piece of paper in three even panels.  Fan fold them together and cut  a diagonal corner off of the top of all three panels..  I did the same cut with the plaid DP making it a tiny bit smaller so the back green paper would show through.

I glued a polka dot ribbon across the top of the polka dot paper and punched a white border with my EK Success paw print border along the bottom edge.  The flag banner was cut freehand with the reverse side of the plaid showing and some purple card stock as mats.  They are hung from a piece of crocheted thread and tied off in a bow at both sides.  The letters are stickers, but you can use stamped letters too.

I know this is another "sweet card".  I started to sass it up by using "You never know who you will find in your bed" as my sentiment.  I know Marlene would love that one. 

Disclaimer:  Blame Cheryl Alger for all this sweetness.  She creates the absolutely sweetest characters to work with.    Gotta love her though, I do.

Peace to everyone and my prayers for everyone in Irene's path.


Monday, August 22, 2011

Chocolate, The Quicker Picker Upper

Sassy Jeni challenged us to use stitches this week over at Sassy Cheryl' Challenge Blog.  Well I dutifully pulled out the old Singer and stitched up these papers and also sewed those two heart buttons on the card.  The little image is called "Cup of Cocoa" and you can get her here.  In fact Cheryl is giving us a Back To School discount on all stamps until Labor Day.  So what better time than right now to pick up some of her cuties.  I myself would have everyone in the store.  The are absolutely the Sassiest!

I thought this would be a good card to cheer someone up or to invite a friend over for coffee, latte or hot chocolate.  I also thought she looked like she was patting the chair cushion as if to say, "If you can't say something nice about someone, come sit next to me".  Remember that line from Steel Magnolias.  One of my very very very favorite movies.  Now those Steel Magnolias had some Southern Sass, didn't they?

Ok enough already, here's my recipe:

  DP - My Mind's Eye - Stella Rose.  The aqua pillows and head cover are the flip side of the yellow gingham checked.  The aqua is from My Little Shoebox, the pearly-white shiny scalloped is from my stash.  The pink and white ticking paper is from my stash too.

Card stock is Stampin Up and the white I printed the digi on is Cryogen White from the Paper Temptress.  Still my absolute favorite to color on.

Sentiment is from none other than the very talented TLC Creations.

Image was cut with Spellbinder's Square and colored with Copics and I paper-pieced the chair and pillows.  Doily, ribbon and buttons are from my stash.

Definitely a girly girl card.  My husband's comment was "ummm pretty.  I think you just like to color don't you"?  Well DUH!


Sunday, August 21, 2011

Under The Sea

I needed a special birthday card for a special little someone in my life.  I went searching and found this Mermaid over at the Digi Doodle's Shop.  Somehow it popped right into my cart and I am absolutely ecstatic that it did.  I colored her with my Copics and then used some yellow Stickles for sparkle.  Every mermaid has to shine, don't you agree?  I cut her out and popped her up on this gorgeous swirl paper from K& Co.  I thought it looked like swirls of ocean foam perfect for a Mermaid bed.  The background mat is from DCWV Linen Closet collection.  I corner punched with MS, cut slits with my Exacto Knife and slid the blue paper in.  Edged in flowing mermaid style with this iridescent wired ribbon and pearls.  I popped on three little seashell buttons and backed it all on a blue SU card stock.  She is so sparkly and pretty in real life.  This photo really doesn't do her justice.  Sparkles and my photography skills don't go very well together.   :(

I am entering her in the Digi Doodle Shop Recipe Challenge:  Ribbon, 2 backing papers, and 3 buttons.  This is my first recipe card and I found it to be a quick and allowed more flexibility than the sketch challenge.  Why not join me, it's fun and you just might win....

Wednesday, August 17, 2011

Pumpkin Boo

Isn't this the cutest card.  I just had to post it on my blog.  No I didn't design it.  It is a card we made at my Inky Digits Card Club tonight.  Jan Temple, Jeni's Mom, taught the class tonight and this is the card she taught.  I only followed her directions to a T.  The image is a Teddy Bo, there are 3 MS border punches used in this card and a step fold that I was dying to learn how to make.  Did you ever think a spider web could look this good?

Hope you all like it.  I guess you can tell how excited I was over it!

Thursday, August 11, 2011

What's Bugging You?

Sassy Jeni wants to know what is bugging everyone this week.  Well here is my idea of a cute little boy with his woodland friends. Boys do love to collect bugs and they always seem to have a piece of twine in their pockets.  He is called Nature Boy and you can find him here.

I thought a twisted easel card was worthy of displaying my little cutie.  I printed him on the orange card stock and I printed him on Cryogen White cardstock.  I colored the white image with my copics and cut him out.  I then applied him directly on top of the printed image on the orange.  That way I didn't have to cut out all those cute little hairs sticking out on his head and the shoestrings.

The orange card stock is Brazills textured and the brown and cream is SU.  I cut the scalloped frame with my Cricut Stretch You Imagination cartridge.  The square DP is from the Paws and Claws collection from TCP Studio.  The sentiment is from Create With TLC.  Check it out, this is one of Pauline's Freebies.  If you have treated yourself with a peek at her site, you are in for a treat.  Those cute little bugs are EK Success Stickers that I picked up a while back at Walmart for $1.00.  Now that is a bargain!.

If you would like to get buggy with us, get one of Sassy Cheryl's digis and create your own little critter creation!  You can enter it here.

Tuesday, August 9, 2011

When In Drought - A New Light

Here is another picture of the card I posted yesterday.  When I looked at my Blog this morning I did not like the color in the photo.  It bugged me all day, so I decided to repost.  I was just not doing these beautiful papers justice!  I guess I am having one of Marlene's Days.

Monday, August 8, 2011

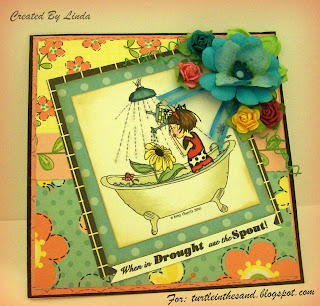
When In Draught........

I made this for the CES challenge this week.  They challenged us to use water in our creation this week.  I was inspired by the terrible drought we have experienced this summer.  We finally got some rain last week, but my poor grass was crunchy and my flowers non-existent this year. This is a Sassy Cheryl digi called April Showers that you can get here.  I think she is precious and have had so much fun making her into several cards.  The flowers are Recollections, the Beautiful DP with all the cheerful colors is from the Garden Party Fields a Bloom collection from My Little Shoebox, LLC.  I used 3 different papers and used both sides of all 3. I just love this paper.  She is colored with Copics and the edges are distressed with Vintage Linen Distress Ink.  Paper Glaze was used on the water to give that wet illusion.  My most excellent sentiment was created by Me.

I had some trouble with my photography on this card.  The curly wires on the flowers were casting shadows on my card, so I used a white light filter from above.  It gave the card a soft cast.  Actually my papers and flowers are quite bright.  Not sure if I like the picture or the real card best.  Whatcha think?

They are having a new Sentimental Sunday Challenge and this week the challenge is to use flowers and a sentiment in the challenge.  I certainly see some flowers here and that catchy little sentiment you know who created is a shoe-in for a qualifier.  Come join us.

Thanks for stopping by now I'm off to do some blogging of my own.  Hugs, Linda

Sassy Cheryl's Show Me Fun #36

Sorry for the shabby photographer skills.  It is late and I should be in bed (work day tomorrow).  I didn't realize that I had it off center of the white background until I cropped.  I was too tired to go back and take another photo.  You can still see this fabulous card so I posted as is.


I can say fabulous because although I made the card, I didn't design it.  Kim Hecker a member of our Inky Digits Card Club taught us all how to make this one.  It is a twisted easel and the stamps are Alice In Wonderland (I believe Clear Stamps, but not positive).  She took a hole punch and punched the holes all around the square then we sewed it with red satin ribbon.  Doesn't that red satin just punch this card right up?

It is hard to believe this talented woman has only been making cards for a few months! 

This is what I was doing on Tuesday night and willing to show all you nosy Sassettes.  If you thought you were going to see my workspace when I was attempting to design my Spinner Card, you were oh so very wrong.  No pictures were taken during that ordeal.  It was absolutely too painful.  Ha Ha.

So show us a picture of what is going on in your world or what you are working on.  Link it up here and you just might win a free digi from the Queen of Sass!  If not, you'll have fun peeking into our worlds  and you just might make new friends while you are at it.

Hugs, Linda

Sunday, August 7, 2011

Spinning Birthday Card


Sassy Jeni wanted to see a unusual fold card this week over at Sassy Cheryl's Challenge Blog.  I saw this spinner shape on Dr. Sonja's Cards, Crafts and Kid's Projects Blog.  Dr. Sonja's is all fancy and beautifully quilled, but I wanted a more classic simplicity look.  I had colored this black and white Funky Double Birthday Cake from Sassy Cheryl's and decided it would be perfect as a spinner card.   Well honey I will just tell you it took me a day and a half to get it all to come together.  An engineer I am definitely not and in the future I will stick to coloring and only try new shapes when I have exact measurements.  I put this card together and tore it apart so often that the poor paper is worn out.  In the end it was not  to difficult of a card and should have been more easy to make, but I sure made a long drawn out affair of it.  But it is finished and here it is.

I made this for one of my tellers and her favorite color is teal.  She is a pretty modern gal, so I think she will like the simplicity of the black and white and teal.  Card stock is SU, Zebra paper and ribbons are from my stash.  I used a bamboo shish-kebob skewer to hold the spinner piece.  Popped some silver brads and aqua bling dots on it.  I made a scalloped border with my SU punch and I was done.

So simple, I bet my grandchildren could have made it with they eyes closed.  Hope you enjoy and if you want a tutorial click on the link to Dr.Sonja's blog in the beginning of this post.